
You downloaded your digital planner with good intentions. You were ready to get organised, plan your week and finally feel on top of things. Then you opened it and immediately felt confused.
The tabs were not working. There were more pages than you expected. You clicked around for a few minutes and still did not know where to start. Instead of feeling productive, you felt frustrated. Maybe you even wondered if you had wasted your money.
This is more common than you think.
Most digital planners are powerful tools, but they are not always intuitive at first glance. When you open something that looks complex, your brain interprets it as effort. And effort feels heavy when you already have a full plate.
The good news is this: you do not need to use every feature, understand every page or customise anything to get value from your planner. You just need a simple starting point.
By the end of this post, you’ll know exactly what to do today.
Here is the truth:
Digital planners are simple once you strip away the noise.
All those extra pages are optional. All those tabs are just shortcuts. At its core, a digital planner is still just a page where you write down what you need to do.
That is it.
You do not need to understand every section. You do not need to use every feature. You do not need to set it up perfectly before you begin.
I am going to walk you through this in the simplest way possible so you can stop feeling stuck and start actually using your planner today.
What Is a Digital Planner?
Before you try to use one confidently, it helps to understand what a digital planner actually is and what it is not.
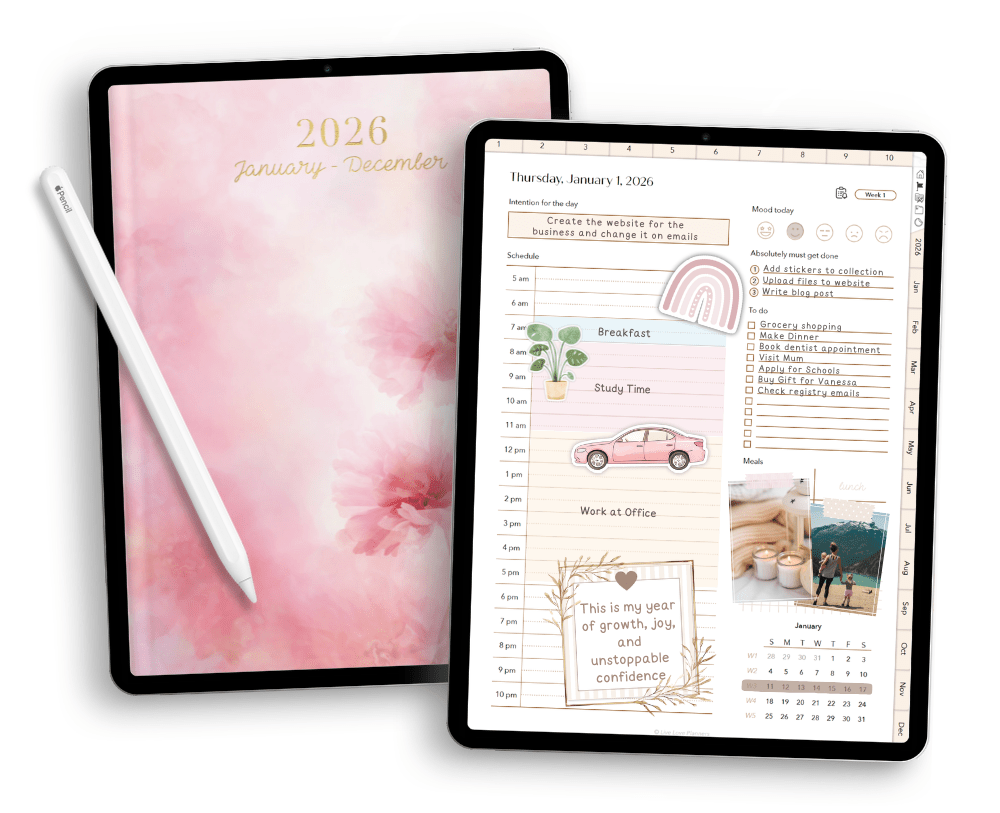
A digital planner is usually an interactive PDF designed to be used on a tablet or iPad inside a PDF annotation app such as Goodnotes, Noteful, Notability or Xodo. You write on it with a stylus or type into text boxes, just like you would with a paper planner, except everything lives on your device.
The important word here is interactive.
Most PDF digital planners include clickable tabs and internal hyperlinks. That means you can tap “January” and jump straight to January. Tap a weekly tab and move directly to that layout. You are not endlessly scrolling. The structure is already built for you.
It is also worth knowing that not all digital planners work the same way.
Some planners are built in Google Sheets or Notion and are designed primarily for desktop use. Those function more like dashboards or databases. They are powerful, but they are not the same as a PDF planner used in an annotation app.
In this post, we are focusing specifically on PDF digital planners used inside annotation apps.
My own digital planners are built this way, clean layouts, structured sections and clickable navigation so you can move quickly without getting lost. The goal is clarity, not clutter. If you are using one of mine, or any similar PDF planner, the principles in this guide will apply.
And if you are still figuring out what works for you, I also have a freebie vault with a range of free planning templates you can test out first. Sometimes trying a few simple layouts helps you understand how digital planning feels before committing to a full system.
At the end of the day, a digital planner is just a structured set of templates designed to help you organise your time and priorities in one place. It is not meant to complicate your life. When used properly, it should reduce mental noise, not add to it.
Step 1: Make Sure Your Planner Actually Works
Before we talk about how to use your planner, we need to make sure you are using the right type of planner in the right place.
Not all digital planners are designed for the same device.
Some digital planners are built for desktop platforms like Google Sheets or Notion. Those work inside a browser and function more like databases or spreadsheets.
Some are designed specifically for iPad or tablets and are meant to be used inside PDF annotation apps like Goodnotes, Noteful, Notability or Xodo.
Others are simplified versions created for phones and used inside apps such as Goodnotes for iPhone or other mobile PDF apps.
If you bought a planner that is meant for an annotation app, it needs to be opened inside one. It will not function properly in a standard PDF viewer, email preview or web browser.
For this post, we are walking through how to use a digital planner inside an annotation app.
Let’s take Goodnotes as an example.
Digital planners designed for annotation apps rely on hyperlinks. The tabs down the side and top are clickable links that jump between sections. But those links only work in Viewing mode (see below).

If you are in Edit mode using the pen tool, the links will not respond. That is normal. The app temporarily disables hyperlinks while you are writing.
To test if everything is working correctly:
-
Switch to Viewing mode.
-
Tap a month tab or section tab.
-
Check that it jumps to the correct page.
If it moves you to the right place, your planner is working exactly as intended.
If you downloaded one of my planners and your tabs are not working, switch to Viewing mode first before assuming it is broken.
Step 2: Ignore 80% of the Pages
When you first open a digital planner and see all the sections, it can feel like a lot. Monthly goals, habit trackers, finance pages, wellness logs, reflections, weekly layouts, daily spreads. It is easy to assume you are supposed to use all of it straight away.
You are not.
Those pages are templates. They exist so you can organise different parts of your life in one place. They are there when you need them, not because you are required to fill them all in.
Think of your planner as a full system. It gives you options. Some weeks you might lean into daily pages. Other seasons you might focus on weekly planning only. At certain times, habit tracking will make sense. At others, it will not.
If you try to activate every section at once, you will feel behind before you even start.
So here is what I recommend, especially if you are new to digital planning: choose one core layout. Either use the weekly pages or the daily pages. Not both. Ignore everything else for now.
You can skip the monthly goal pages if you are not setting clear monthly targets. Leave the habit trackers alone if you know you will not open them consistently. Blank pages are not failure. They are unused tools waiting for the right time.
Your planner is designed to support your life, not create pressure. Start small. Use what helps this week. Add more later if and when it feels useful.
Step 3: Start With One Simple Page Today
Step 4: Build the Habit Before You Customize
Common Mistakes That Make Digital Planning Harder
If you are trying to figure out how to use a digital planner and it still feels difficult, one of these habits might be the reason.
1. Switching planners every week
It is tempting to download a new layout every time you feel unmotivated. A fresh design feels exciting. But constantly switching prevents you from building rhythm. You never stay in one system long enough to let it work.
Pick one planner and commit to it for at least a few weeks before deciding it is not right for you.
2. Trying to replicate paper planning exactly
Digital planning is similar to paper planning, but it is not identical. You do not need to recreate every sticker spread or fill every inch of space. Digital planning works best when it is clean and functional.
Use the structure. Do not feel pressure to make it look decorative.
3. Overfilling every section
Just because there is space does not mean you have to use it. Writing down everything in your head can feel productive, but it often creates visual overwhelm.
Prioritise clarity over completeness.
4. Restarting when you miss days
This is a big one.
You miss two days and suddenly feel like the week is ruined. So you jump to a new week. Or a new month. Or a new planner.
You do not need to restart.
Digital planning is flexible. If you miss a day, simply open the current date and continue. Blank pages are normal. They are not evidence of failure.
Learning how to use a digital planner properly is less about perfection and more about consistency. Keep it simple. Keep going.


")

")